A sable brush is a very high-quality brush often used in modelling for detail work thanks to its ability to be finely...

Cart 0 Product Products (empty)
No products
Free shipping! Shipping
£ 0.00 Total
Product successfully added to your shopping cart
Quantity
Total
There are 0 items in your cart. There is 1 item in your cart.
Total products (tax incl.)
Total shipping (tax excl.) Free shipping!
Total (tax incl.)
Search Tips
Tips categories
Latest Tips
-
 What is a sable brush?Read more
 -
 What is the Hornby RailRoad range?Read more
Hornby Railroad models are a range of locomotives and rolling stock manufactured by Hornby to be a little less...
-
 When weathering, is an airbrush or a regular brush best?Read more
When weathering, many modellers favour an airbrush over a regular paintbrush for the bulk of the work. But as we...
-
 What are cross-lock tweezers?Read more
Cross lock tweezers perform the same function and appear similar in design to regular tweezers, the difference being...
-
 How do I make a tunnel on my railway layout?Read more
Creating a tunnel on your model railway layout can add depth and realism to your setup. Here’s a step-by-step guide...

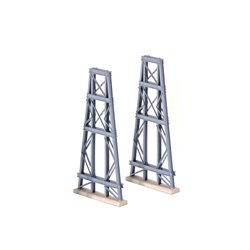
Make your own wooden trestle bridge for a layout.
One of the most enjoyable elements of creating a layout is to scratch-build significant scene elements, whether that be buildings or other fixed structures such as bridges. Many manufacturers will create such elements in kit form and these can be easily built and integrated into a layout. One drawback of using this 'off-the-shelf' approach is that the kit in question may not always integrate easily into the layout. In this case, the layout may have to be adjusted to accept the item. This is time-consuming and may result in additional work that the modeller had not initially factored in.
One alternative approach is to scratch-build items which can be adapted as required to fit into the landscape. For example, a wooden trestle bridge can be designed and built with minimal cost and will inevitably be rewarding to assemble. The initial design can be broken down into specific elements such as vertical supports and transverse supports and sketched onto a sheet of paper at the appropriate scale for the intended layout. This now forms the assembly plan/template and can be secured in place onto a corkboard and covered with wax paper. The individual wooden elements can now be placed on the board and assembled in place using the plan as a template. Pins can be used to hold the individual pieces in place whilst adhesive is applied to assemble specific elements. The wax-proof paper will protect the plan/template by ensuring any excess glue is easily removed and does not inadvertently glue the assembly to the plan!
Once individual assemblies have been created and the glue has cured sufficiently these elements can then be test-fitted onto the layout to check for correct fit and alignment and to establish any requirements for fine-tuning. Once all is ok the individual elements can be assembled in situ if required or can be assembled remotely if that may be easier to factor in any painting or weathering requirements needed.
Posted in: Assembling and gluing
Click here to receive the tips weekly in your mailbox. You can unsubscribe at any time.
Related products
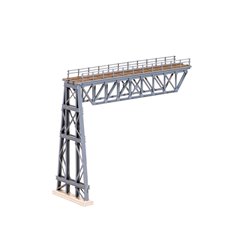
Truss Girder Bridge span and single trestle
Price: £ 26.40Truss Girder Bridge span and single trestle
Related posts
-
 Do I need to wash my plastic kit?I personally wash all my plastic kits, I use warm soapy water (Washing up liquid) and a light rub over with a nail...
 - What is Milliput?Milliput is a two-part epoxy putty. There are two different colour rolls in a box when these are mixed together it...
- What modelling tools do I need to get started?Most modellers have an extensive tool kit, a tool for every eventuality. But when first starting a scalpel or a...
- How do I remove parts from the sprue?The short answer is carefully. The best way is with a sprue and plastic cutter but always be mindful of exactly...
- Do I need a cutting mat?It is not essential to have a cutting mat, but it is a good idea. It saves getting in trouble with your significant...