Mainline Railways was a British model railway brand that operated between 1976 and 1983, introduced by Palitoy, the...

Cart 0 Product Products (empty)
No products
Free shipping! Shipping
£ 0.00 Total
Product successfully added to your shopping cart
Quantity
Total
There are 0 items in your cart. There is 1 item in your cart.
Total products (tax incl.)
Total shipping (tax excl.) Free shipping!
Total (tax incl.)
Search Tips
Tips categories
Latest Tips
-
 What was the Mainline Railways company?Read more
 -
 What is a Wickham Trolley?Read more
A Wickham Trolley is a small railway maintenance vehicle once widely used across Britain's railways. Built by D...
-
 What was the Bachmann 'Blue Riband' subbrand ?Read more
The Blue Riband subbrand was a significant step in the evolution of Bachmann Branchline, the UK division of Bachmann...
-
 Do I need to apply a camber to a tight curve of track on my layout?Read more
Applying a camber to a tight curve of track on your model railway layout can help improve the realism and operation...
-
 Avoiding the "Toy Train Look": Realistic Track ArrangementsRead more
A well-designed model railway is more than just a collection of tracks and trains: it’s a miniature world that...
Open on Good Friday
The shop will be open on Friday 18th April.
Bring us some chocolate!

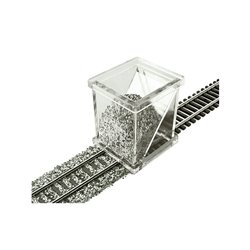
How does a ballast spreader work?
A ballast spreader is a plastic box about two inches square. On the base, there are two grooves that sit on the rails. Inside the spreader there is a slanted piece of plastic with three slots in the base, one in the centre and one either side and works like a silo hopper.
You place the spreader onto the tracks that you are going to ballast, then fill the spreader with ballast and slowly move the spreader along the track.
The ballast will fall through the three slots at the bottom adding ballast between the rails and either side of the track, giving you the perfect amount of ballast and minimal overspill, saving you time and effort in cleaning up excess ballast from your layout.
Once the ballast is down, simply glue into place, using a mixture of 50% PVA glue and 50% water and a couple of drops of washing up liquid to ease surface tension.
When applying the mixture use a syringe as this will give you better control as the mixture is dispersed.
When filling the syringe ensure that you give the mixture a good stir every time as the glue and water will separate if left for any length of time.
An easier approach to the PVA mix is to use ready to use ballast glue.
Click here to receive the tips weekly in your mailbox. You can unsubscribe at any time.
Related products
HO/OO Scale Ballast Spreader
Price: £ 15.25Proses PROBS-HO-01 HO gauge ballast spreader. Designed to help spread ballast...
N Scale Ballast Spreader
Price: £ 15.25Proses PROBS-N-01 N gauge ballast spreader. Designed to help spread ballast...
Ballast Bond Liquid Adhesive (100ml)
Price: £ 9.25Ballast Bond Liquid Adhesive (100ml) Super thin, ready mixed adhesive for...
Related posts
-
 How to clean model railways track?There is of course the old tried and tested method, the track rubber which does the job, no railway modeller should...
 - What scale is Hornby?Hornby model railways are OO Scale or 1/76th that is 4 millimetres to the foot (12 inches). It runs on a track with...
- Is Peco track and Hornby track compatible?Peco Setrack and Peco Streamline are compatible with Hornby track as they all share the same gauge width of 16.5mm....
- How to weight my model so it does not tip?For wargaming figures, a small coin or washer glued to the under side of the base will usually to do the job. This...
- How often should I clean my track?This a hard question to answer. There are no hard and fast rules about how often you should clean the track. Bear in...