A puffer bottle is a manually operated specifically-shaped container that is used to prepare static grass for...

Cart 0 Product Products (empty)
No products
Free shipping! Shipping
£ 0.00 Total
Product successfully added to your shopping cart
Quantity
Total
There are 0 items in your cart. There is 1 item in your cart.
Total products (tax incl.)
Total shipping (tax excl.) Free shipping!
Total (tax incl.)
Search Tips
Tips categories
Latest Tips
-
 What is a puffer bottle?Read more
 -
 How can I learn where to place my signals?Read more
Deciding where to place signals on a model railway layout can be extremely confusing as there are many rules to...
-
 Which railway was the SNER?Read more
S.N.E.R. stands for the Scottish North Eastern Railway, it was the result of a merger between the Aberdeen Railway...
-
 What are powerbase plates used for?Read more
Powerbase plates sound as though they're going to be very high-tech with lots of microchips, wires and a complex...
-
 What is a Wickham Trolley?Read more
A Wickham Trolley is a small railway maintenance vehicle once widely used across Britain's railways. Built by D...

How do I make a tunnel on my railway layout?
Creating a tunnel on your model railway layout can add depth and realism to your setup. Here’s a step-by-step guide tailored for a UK modeller:
Materials you may need:
- Cardboard or plywood for the tunnel base
- Modelling plaster or foam for shaping the hills or mountains
- Tunnel portals (these can be purchased pre-made or crafted)
- Scenery materials such as flock, trees and grass for detailing
- Paints to match the surrounding landscape
- PVA glue or hot glue gun for assembly
Steps to build your tunnel:
Plan the location
Decide where your tunnel will be. It could cut through a hillside or a small mountain. Ensure the track has a smooth gradient before and after the tunnel to avoid derailments.Create the base and frame
Lay down your track first, ensuring it runs smoothly. For the tunnel, you can construct a simple framework out of cardboard, plywood, or foam. This will form the rough shape of the hill or mountain that the tunnel will pass through. Make sure there's enough clearance inside for your trains to pass through without obstruction.Tunnel portals
Attach tunnel portals to both ends of the tunnel. You can buy these ready-made from model shops or you can build your own using plaster, foamboard or even printed card. Ensure they are securely attached and aligned with the track.Shape the terrain
Using foam, plaster, or papier-mâché, build up the terrain around the tunnel. Be creative with the shape of the hill or mountain. Carve or mould the materials to get a natural look, ensuring it blends seamlessly with the rest of your layout.Paint and texture
Once the structure has dried, paint the hill or mountain using earthy tones. Dry brushing with lighter colours can highlight the texture and make it more realistic. After painting, apply scenic materials like grass flock, bushes and trees to create a natural landscape.Finishing touches
Add small details such as bushes, rocks or weathering to the tunnel portals to blend them into the landscape. You might even want to place a few figures or vehicles around the entrance to bring the scene to life.Test the tunnel
Before finishing the surrounding scenery, run a train through the tunnel several times to make sure it moves smoothly without catching on the sides or roof.
By following these steps, you'll have a custom tunnel that enhances the realism and immersion of your railway layout.
Posted in: Scenery
Click here to receive the tips weekly in your mailbox. You can unsubscribe at any time.
Related products
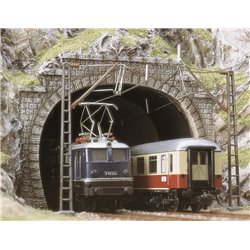
Twin Electric Loco Portals (2)
Price: £ 4.25Pack of two stone-effect, horseshoe shaped, double-track tunnel portals with...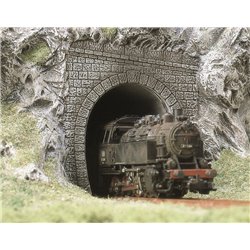
2 Tunnel Portals
Price: £ 3.75Pack of two stone-effect, horseshoe shaped, single-track tunnel portals with...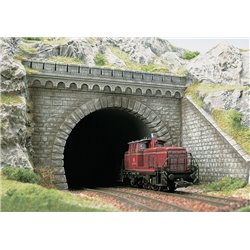
Double track tunnel portal with stone walls (2)
Price: £ 10.75Double track tunnel portal with stone walls (2) A double-track tunnel portal...
Related posts
-
 Is static grass better than scatter?I use both, separately and together. Static grass comes in various sizes from 0.5mm to 12mm while scatter is...
 - How do I apply static grass?Static grass is best applied using a static grass applicator. There are several on the market and they can apply...
- What colour are tree trunks?Tree trunks are actually grey in colour and not brown as you would think. The next time you are out and about just...
- How to make hills?You can make hills in a variety of ways. The tried and tested way is with chicken wire and papier mache. This is a...
- How do I glue scatter?Select the area where you want the scatter, then apply a layer of PVA glue, sprinkle your grass covering the glue....